Frontend Quickstart
Use this guide to add Imgwire uploads, transformations, and image rendering to a browser, React, or React Native application.

Before you start
Complete the setup guide first so you have an Imgwire account, organization, and Environment.
For frontend applications, create a Client Key. Client API keys are publishable and are designed to be used in browser and mobile application code. Do not put a Server Key in frontend code, React Native bundles, or public static assets.
Create a Client API Key
In the Imgwire dashboard, open API Keys, choose Create API Key, and select Client Key. Give the key a clear name for the frontend app or mobile app that will use it.
Use the API key settings to decide which upload flow your app should use:
- Enable Allow Unsigned Uploads when you want the fastest setup and do not have a backend endpoint yet.
- Leave unsigned uploads disabled when your app should require signed upload requests from a backend endpoint.
- Set upload limits and supported image types to match what your UI accepts.
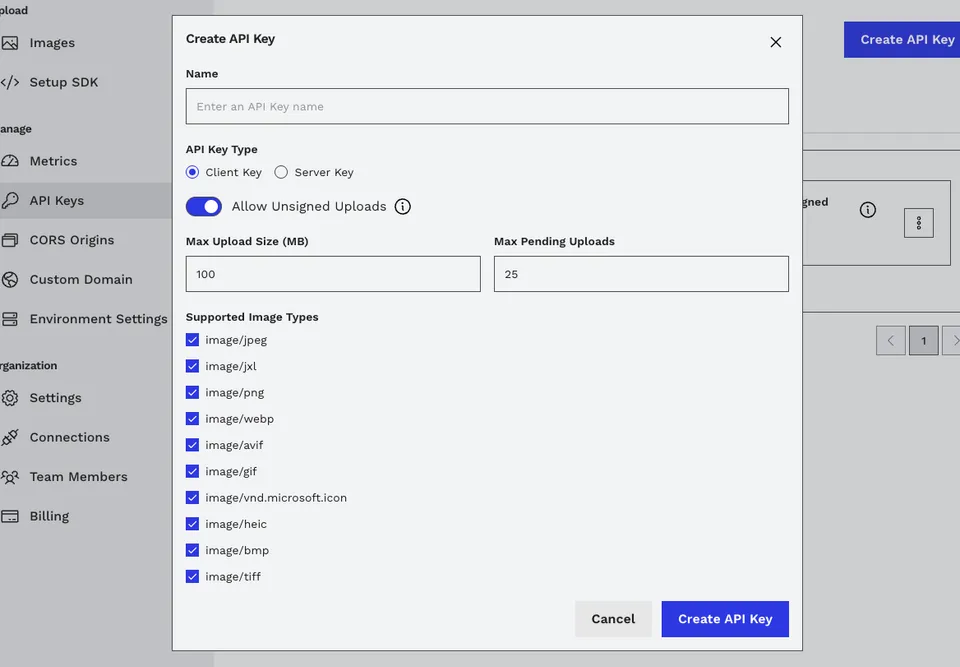
Create a Client Key for frontend uploads and choose whether unsigned uploads are allowed.
Signed vs unsigned uploads
Unsigned uploads are faster to add because the frontend can upload with only a Client Key. They are less secure because anyone who has the publishable key can attempt uploads within that key's configured limits.
Signed uploads require your backend to issue an upload token before the frontend uploads the file. Use this flow when uploads should depend on your app's authentication, user permissions, or server-side validation. For a concrete backend example, see issuing Imgwire upload tokens from a Next.js API endpoint.
Install a frontend SDK
Use the package that matches your app surface.
yarn add @imgwire/js
For React web apps, install the React SDK and the underlying JavaScript SDK:
yarn add @imgwire/react @imgwire/js
For React Native or Expo apps:
yarn add @imgwire/react-native
Store your Client Key in the public environment variable system for your framework. For example, Vite uses VITE_ variables, Next.js uses NEXT_PUBLIC_ variables, and Expo uses EXPO_PUBLIC_ variables for values that are intentionally shipped to the client.
Upload and transform with JavaScript
Use @imgwire/js when you want a framework-neutral browser integration.
import { ImgwireClient } from '@imgwire/js';

const client = new ImgwireClient({
  apiKey: 'ck_...',
});

const fileInput = document.querySelector<HTMLInputElement>('#image-file');
const preview = document.querySelector<HTMLImageElement>('#image-preview');

fileInput?.addEventListener('change', async () => {
  const file = fileInput.files?.[0];
  if (!file || !preview) return;

  const image = await client.images.upload(file, {
    onProgress(progress) {
      console.log(progress.percent);
    },
  });

  preview.src = image.url({
    preset: 'medium',
    format: 'auto',
    quality: 'auto',
  });
});
The uploaded image object includes its Imgwire image ID and a url(...) helper for CDN transformations. Store the image ID or CDN URL in your app data depending on whether you need to fetch metadata or create more transformed variants later.
Add signed upload tokens when needed
If your Client Key requires signed uploads, configure getUploadToken on the SDK client. The frontend calls your backend, your backend validates the request, and the backend returns an Imgwire upload token.
import { ImgwireClient } from '@imgwire/js';

const client = new ImgwireClient({
  apiKey: 'ck_...',
  getUploadToken: async () => {
    const response = await fetch('/api/imgwire/upload-token', {
      method: 'POST',
    });

    if (!response.ok) {
      throw new Error('Unable to create Imgwire upload token');
    }

    const { uploadToken } = await response.json();
    return uploadToken;
  },
});
Use the Next.js upload token tutorial when you need a working backend endpoint pattern.
Upload and render in React
Use @imgwire/react when you want React context, upload progress state, and declarative image rendering.
import { useState } from 'react';
import { Image, ImgwireProvider, useUpload } from '@imgwire/react';

const imgwireConfig = {
  apiKey: 'ck_...',
};

export function App() {
  return (
    <ImgwireProvider config={imgwireConfig}>
      <UploadAndPreview />
    </ImgwireProvider>
  );
}

function UploadAndPreview() {
  const [imageId, setImageId] = useState<string | null>(null);
  const [upload, progress] = useUpload();

  return (
    <section>
      <input
        type="file"
        accept="image/*"
        onChange={async (event) => {
          const file = event.target.files?.[0];
          if (!file) return;

          const image = await upload(file);
          setImageId(image.id);
        }}
      />

      <p>{progress.percent ?? 0}% uploaded</p>

      {imageId ? (
        <Image
          id={imageId}
          preset="medium"
          format="auto"
          quality="auto"
          alt="Uploaded preview"
        />
      ) : null}
    </section>
  );
}
For responsive web images, use <ResponsiveImage /> from @imgwire/react. It generates responsive image markup with Imgwire transformation URLs. See responsive image variants with srcset for the full pattern.
import { ResponsiveImage } from '@imgwire/react';

<ResponsiveImage
  id="img_..."
  alt="Gallery image"
  format="auto"
  quality="auto"
  breakpoints={{
    sm: { minWidth: 0, width: 320 },
    md: { minWidth: 640, width: 640 },
    lg: { minWidth: 1024, width: 1024 },
  }}
/>;
Use Imgwire in React Native
Use @imgwire/react-native for Expo or React Native apps. It provides ImgwireProvider, Image, and useUpload with native file URI support.
import { useState } from 'react';
import { Button, View } from 'react-native';
import { Image, ImgwireProvider, useUpload } from '@imgwire/react-native';

function Screen() {
  const [imageId, setImageId] = useState<string | null>(null);
  const [upload, progress] = useUpload();

  return (
    <View>
      <Button
        title={`Upload (${progress.percent ?? 0}%)`}
        onPress={async () => {
          const image = await upload({
            uri: 'file:///path/to/image.jpg',
            name: 'image.jpg',
            type: 'image/jpeg',
          });

          setImageId(image.id);
        }}
      />

      {imageId ? (
        <Image
          id={imageId}
          style={{ width: 300, height: 200 }}
          width={600}
          format="auto"
        />
      ) : null}
    </View>
  );
}

export default function App() {
  return (
    <ImgwireProvider config={{ apiKey: 'ck_...' }}>
      <Screen />
    </ImgwireProvider>
  );
}
Replace the hardcoded file:// URI with the URI returned by your image picker or camera workflow.
Next steps
- Use responsive image variants with
srcsetto optimize layout-sensitive React images. - Use the Next.js upload token tutorial when you need signed uploads.
- Review the Transformations API overview when you want more control over generated CDN URLs.
Last updated at: May 9, 2026